The microtransaction system allows you to create and manage in-game purchases. Players can buy items, coins, boosts or permanent unlocks using their Acroms. The entire system is integrated with the engine’s API, so you do NOT need to implement your own payment logic.
From the developer panel you can create all the microtransactions for your project. You can access the Project Microtransactions menu from your dashboard interface.
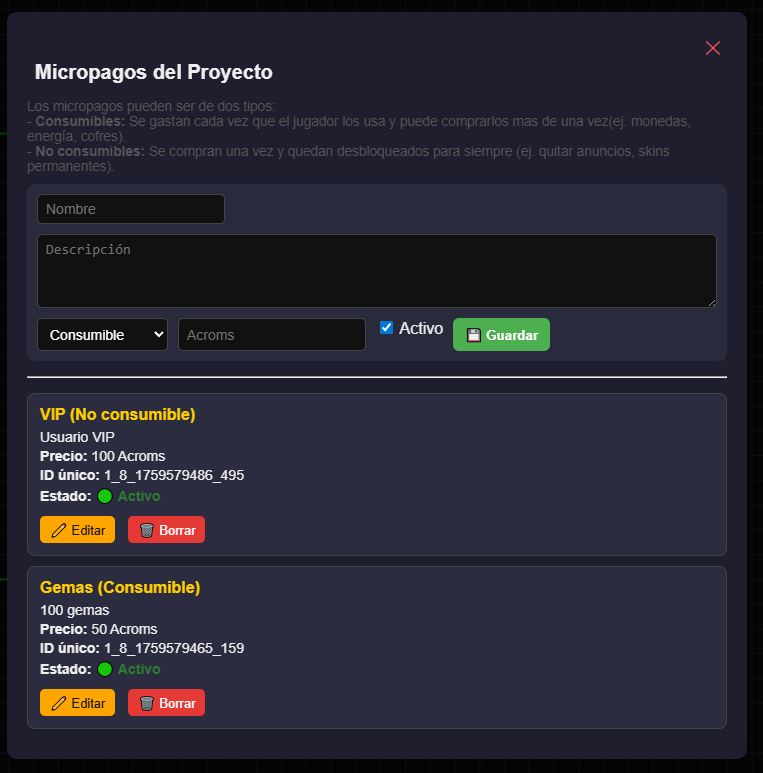
1_8_1759579465_159).
That ID is what you must use in your game code.
VIP (Non-consumable)
VIP User
Price: 100 Acroms
Unique ID: 1_8_1759579486_495
Status: Active

Gems (Consumable)
100 gems
Price: 50 Acroms
Unique ID: 1_8_1759579465_159
Status: ActiveOnce created, you can easily manage microtransactions from your scripts in the engine’s editor using the API functions.
async function ShowShop() {
  const items = await GetAvailablePurchases();
  if (items.length === 0) {
    console.log("No products available.");
    return;
  }

  items.forEach(i => {
    console.log(`🛍️ ${i.Name} (${i.ID}) - ${i.Price_acroms} Acroms`);
  });
}Use the microtransaction’s unique ID to perform the purchase:
function Start(obj) {
  onClickUp(obj, () => {
    BuyItem("1_8_1759579465_159").then(res => {
      if (res.status === "ok") {
        console.log("Purchase completed:", res.msg);
      } else {
        console.warn("Error:", res.msg);
      }
    });
  });
}You can check what items the player owns at any moment:
async function ShowInventory() {
  const items = await GetUserInventory();
  if (items.length === 0) {
    console.log("The player has no items.");
    return;
  }

  items.forEach(i => {
    const type = i.Consumable ? "Consumable" : "Permanent";
    console.log(`${i.Name} (${type}) - Remaining: ${i.Remaining}`);
  });
}// "Shop" button script
function Start(obj) {
onClickUp(obj, async () => {
const shop = await GetAvailablePurchases();
if (shop.length === 0) {
console.log("Shop is empty");
return;
}
console.log("🛒 Available products:");
shop.forEach(i => {
console.log(`${i.Name} (${i.ID}) - ${i.Price_acroms} Acroms`);
});
// Example: buy the first item
const id = shop[0].ID;
const result = await BuyItem(id);
console.log(result.msg);
});
}
Consumables include a Remaining field that indicates how many units the player still owns.
You can handle their usage from your scripts:
async function UseGem() {
  const inventory = await GetUserInventory();
  const gems = inventory.find(i => i.Name === "Gems");

  if (!gems || gems.Remaining <= 0) {
    console.log("❌ You have no gems available.");
    return;
  }

  console.log("Using one gem...");
  // Apply its effect here (revive, energy, etc.)
}BuyItem("ID").GetUserInventory().